One Method to Add Photo Captions Visually Below Your Digital Photos


For most people, I still think the best and easiest way to preserve the description of what's in each of your archived photos in your collection is to enter this information into the reserved caption or description field using a photo managing program or editor.
This insures that it will stay embedded inside, within the metadata of your master images, and can later be accessed by any other application that is written to utilize it.
I've written how to do this in four of the best programs in an article called “The Best Way to Add a Description (Caption) to Your Scanned Photos.”
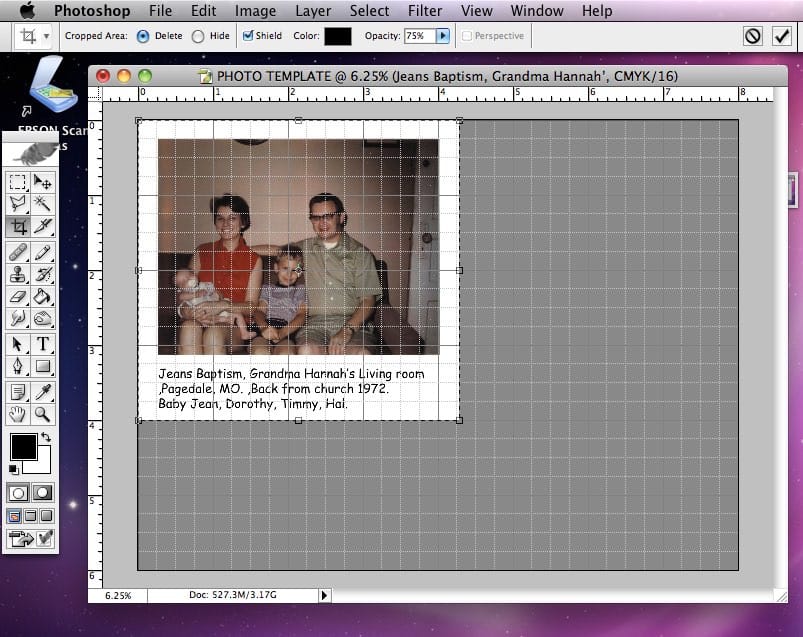
But, for a select few, you still may be wishing there was also a way to record this information as real “visual” text that could be shown with each of your photos — like it was almost part of the image itself as seen in the image at the top of this post.
And I can understand this wish since currently it's fair to say many photo viewing applications you may wish to use aren't even capable of displaying your embedded captions when typed into this captioned (metadata) field. It's not that it's that hard to write applications that do so, it's probably just the programmers don't think you care much about photo captions, so why spend the time coding it.
So when Tim Stenzinger wrote me one day and said he was experimenting with a way of using Photoshop to do this very thing, I was very interested in finding out more about his method. Not only that, Tim was very generous with his time and was willing to document each of the steps in the post below for anyone who's interested in following along.
Even if this isn't something you would want to take the time to do for every photo within your entire collection, it's still possible you may want to do this with select ones.
Please welcome Tim to Scan Your Entire Life, this is his first article here. And if you have any questions for him after reading this, feel free to ask him in the comments below. Enjoy!
This is a cool way to add captions to your scanned photos without having to rely on embedded metadata. In other words, this way would allow you to have the written caption as a part of the JPEG or TIFF file itself. The main advantage to this idea is not losing your captions over the years (possibly even centuries) should an application “accidentally” delete or write over the metadata contents.
Programs change, data conversion can get lost — this way your caption is part of the photo itself and thus your written information for your photos shouldn’t be lost (the only way this could happen would be to crop it off from the photo). So years from now, people will know who or what is in your photo, and/or any other tidbit you might want to include.
Create a Template
The first thing to do is create a template in Adobe Photoshop for Mac or PC (or an image editor of your choice with fairly comparable features).
Since 99 percent of these scans would be fairly small in size, I made the template only 8 inches wide by 6 inches high. Anything larger would simply need a custom made, larger template.

I scan 4″ by 6″ photos at 1200 dpi — which is why this template is created at 1200 dpi as well. That way, if a person enlarges this photo to something like 8 by 12 inches, it’s dpi will be somewhere around 600. This is twice as high as what most people feel necessary.
Most experts would scan a standard 4″ by 6″ photo around 600 dpi. And in scanning photos at 1200 dpi, it might be overkill and take longer to scan as well as gobble up tons of megabytes! But that’s just me! I want to be able to zoom into these photos without loosing any details. So it’s up to you. What most people recommend is to scan photos at 600 dpi thus you can create this template at 600 dpi as well.
Also, I choose to use 16-bit RGB color rather than 8-bit. Is that really necessary? Probably not. Will it take longer to process, and gobble up more megabytes? Totally! But is it superior for editing photos? (Such as enhancing color etc.) It sure is.
So really, it’s all up to you. You could use 600 dpi at 8-bit, or go nuts like me and choose 1200 dpi at 16-bits. In a nutshell, my way is totally higher in quality, but it will be harder on your computer, slower to scan, and it will take more memory and storage.
Add a Temporary Text Placeholder

Later, after loading the photo onto this template, I would type over the word “what” with the actual subject of what the photo is. Then I would move on to the other word “where” and type over that with the actual location. These details are better displayed later on these instructions.
Add a Photo
After I have scanned a few pictures and have them sitting in a folder somewhere on my computer, I then move them into this template. So, all I do for that is to open the photo in Photoshop, then I “select all” by pressing Command and the letter A for “all.” That’s how it is on the Mac (Windows users it would be Control and the letter A). Then I hit Command-C to “copy” it to the computer's (invisible) clipboard.

Then I close that photo and (with the template already open) paste the image onto the template by pressing command and the letter V. (Control-V for Windows users)

Arrange the Photo and Insert Captions
Since I like to create a frame around the photo, I like to have it centered out perfectly. So my first thing to do is to display the grid lines on the Photoshop template. To do this I simply go to “view” then “show” and select “Grid” (Or simply select “Command” and the ‘ key). Doing that again will turn the grids back off too.

Now that the grid is selected you can drag the picture to where ever you want. I like to slide it to the corner of the first grid lines (both vertical and lateral).
Now is when I’ll start typing over the words of the template text. But before I do, I’ll slide the text under the picture and try to center things out the best I can. So when I do type, I keep an eye on the photo and when I should start the next line. If at all possible, I try to start new lines for the different descriptive factors (ex: What, and where is on line one along with the band name, the actual people’s names are on line two, and the details are on lines three and four).
In this example, I typed over the word “what” with “Concert at Kennedy’s Bar.” Then I typed over “Where” with “St. Louis, MO.” I continued on this way even adding any special notes and interesting facts about this photo.
* I use this text template in order to remain consistent. Of course you don’t have to use it, you could simply start typing away with your own narration. I just like doing it this way to keep me as consistent as possible.
Also notice, I did not center this picture in the middle of the template. That would be wasting space. So after moving everything to the upper left corner, then I move on to the next step: cropping off the dead space.

Cropping and Saving Photo
Now it’s time to crop off the dead space. I simply select the cropping tool and use the grid to get a good approximate frame around the whole picture. Once I do, I hit “enter” to complete the crop.

And here is what I am left with!
At this point it’s a good idea to see if everything looks good to you. Make sure everything is spelled correctly, and reads nicely. Also make sure the text is centered out under the picture nicely. Then turn the grid lines back off.
Then I’ll flatten the image (I figured, to save space who really needs a layered file if the only thing I did with the photo was create a small caption. I figure if I ever needed to change the caption, I would simply color out the old caption and add the new text on a new layer. Then I would flatten it again).
To flatten this image, I went up to “layer” on the menu bar and then selected “Flatten image.”

Then I simply save it as (whatever name, or naming system I want), but I save it with the TIFF file format (File > “Save As”).
I feel if I am going to go through the trouble of doing all this, and using such high quality settings, I am certainly going to save it as a high quality format that doesn’t degrade if I were to edit it in the future. But then the question is, what about loading it to the Internet. And that’s why after saving this as a TIFF, then I hit “Save As” again, and save it as a JPEG file.
You can be the judge of how high of a JPEG quality setting you want. But I will suggest save it as: High quality (at least 10) and select “baseline optimized.” This might be too large to upload onto some sites, if so, maybe save it as a lower quality file (maybe 3 or 4). But I would still use the baseline optimized selection.
Basically it comes down to having a master file (TIFF) and possibly a few different sized copies to send to your friends or upload to some site on the internet (JPEG).
And that's it! That's your first photo saved with a visual caption written out below it.

Reusing This Master Template For Your Entire Photo Collection
Now you can open the template again (which should be blank if you saved the previous picture “save as” which would leave the template unaltered). This time I will show you another size picture and how the same process will work for this too.
Open Template and Open New Picture

Select-All On Picture, Select Copy, and then Paste to the Template

Add Text, and Arrange

Crop. Turn Off Grid Lines
Save Your Image As Something Else
Click on (File > “Save As”) from top menu item.
With this template, you can copy almost any shap of picture. You could choose to add captions at the bottom of the photo, or if it’s a skinny picture (like a school portrait) you can put the text to the side of the photo. Whatever you like!
Here is an example of how different photos fit into the template. The key is to remember to save the template “as” something else and not just hit save by itself. The worse case scenario is you may have to make a new template if you screw up and only hit save instead of save as.

I hope this idea was a help to you, and people for generations will have at least some information about your photo no matter where it winds up on the internet or elsewhere.
If you have any questions about how I did any of the steps above, just ask away in the comments below.
Have fun!


After a month long search, I found software that does this without having to create a template! It’s not really advertised here in the U.S.; its developer is in Australia. It’s wonderful! Link below!
https://captionpro.com.au:444/AlekaConsulting/index.php/caption-photos/
Besides Adobe Photoshop, what other software is available to do what you have described? Adding to caption to bottom of the photo? this is the one part that is important to me to pass on what’s what and who’s who in the photo to present and future generations.
Hi, I’m a skittish starter to all the scanning etc. so I apologize if this isn’t where I should be posting this question. Here’s the thing – I have lots of photos that I want to preserve the writing on the back SO is there a way to use that as the caption. Like a cut and paste of the actual writing?
Can you be detailed as to how I would go about this. It would be sooo Cool! Thank you in advance
I have just found your article and am so happy as I am scanning and archiving family photos. This seems to be exactly what I want. I have GIMP but have not figured it out on my MAC. If I can follow this article I may be able to or perhaps I’ll purchase Photoshop. Good idea suggested in comments also.
Just want to say Thank you Tim
For your information a while ago Adobe made changes to their Photoshop CS2 authentication servers. Since then they are allowing people to download and install CS2 [a very old, but very usable version for Mac or Windows]. All you have to do is register with Adobe.
How To Download Adobe Photoshop CS2 For Free Legally
http://www.redmondpie.com/download-adobe-photoshop-cs2-for-free-legally-while-you-still-can/
Thanks Janis I am glad my article helped you out! One thing about Photoshop if you purchase it, it has changed a bit and these instructions might not be accurate anymore unless you purchase the Photoshop that I am I am using which is Photoshop six LOL. I’m sure the new versions can do the same thing but you might have to dig around the program to find how to do those things. Personally I wish these programmers would just keep the programs the same LOL happy scanning! Tim
Thanks to Tim’s detailed instructions for photoshop captioning, finding similar actions in the GIMP was reasonably straightforward. The key part was creating the bare template which is under the WINDOWS menu at “dockable dialogs” -> “templates”. In that dialog, select a size, e.g. 1024×768, then click on the lower left icon “create a new image from selected template”
The rest of the steps are similar to the photoshop ones.
GIMP v.2.8.20 on macos 10.12..5.sierra (latest is 2.8.22) — Mike
Tim, thank you for all your hard work of figuring so much of this out and communicating it for our benefit. I’m new at this. I was wondering if it would be practical to adapt this template concept to full photo album pages. In other words, the template would be the size of a album page and then populated with various photos and captions. Then the pages could be printed out and placed in hard copy volumes, by year maybe, for anyone to look at. Each page would have a ID number so if a page was damaged then it could be reprinted easily. This might be an easy way for, say your kids want to see what style you rocked during high school then they could pull that year’s album, or a visiting relative could pull the years of albums to peruse and reminisce. What settings would work for a full page template. Also school photos where your classmates wrote something personal on the backs of their photos before giving away, with your method they could be arranged with both the front and the back of the photo paired up on the pages so we could easily go back a read them. Oh joy!
That is a killer idea Dan! A full page would take more memory but I would guess 600 dpi for the whole thing. That way it’s still good quality without killing your computer! And the possibilities are endless with differant fonts and symbols and artsy things posted around the photos. Great idea!
I hope my reply worked lol. Great idea! I would say 600 dpi
Dan,
I like your idea and general concept of pages and page templates. Because of the limitations on dpi mentioned by Tim, I wonder how practical it would be if using pages larger than 8.5 x 11. Also, large format printers are pricey and not readily available.
I wonder if a software program that inserts the pictures onto the page as it processes a group of pictures might be more straightforward. I think it all depends on the size of your project, the size of your album, and the interest of family members. Such a program would still store the pictures in their native format but output a .pdf file for printing and screen viewing purposes.
I haven’t tackled this aspect of my project yet, but I am thinking of using a book publishing service like Blurb.com to produce copies in book form for my family. Blurb has software that lets you tell a story along with your pictures. I don’t believe, however, that you can reprint individual pages.
Lightroom also has a book publishing component. This can be used to provide a file for Blurb or can be used with your own printer. I think you can print a specific page with Lightroom but I have not tried it yet. Lightroom suffers with weaknesses in the text processing that would make a long book a challenge.
I intend to evaluate a relatively inexpensive desktop publishing program, Serif PagePlus, to see how it will work for my needsbut I may need to go to Adobe InDesign to get the functionality I want. For perspective, the project I am just starting will involve a family history book, probably more than 200 pages including genealogy charts, photos, and an extensive narrative.
I definitely think your approach is worth trying. Please keep us informed of what works for you and what the problem areas are.
Here’s a tip I use all the time with business documents.
After you save your template, find the file with Windows Explorer or other file manager utility. In Windows, right-click the file and choose Properties. Put a checkmark in the Read Only box. Click Save. With this change you can’t accidently over-write your template. It’s also possible to make files read-only through the command line.
I actually utilize this feature in Windows by just clicking Save when I’m done with modifying the template. I save sequentially numbered invoices this way. Windows complains that the file is Read Only and shows me a window listing the files in the folder with the template. I click on the name of the last file I saved then edit the name to one number higher and click the Save button. Much easier than retyping the whole name each time I save a file.
Leon
Very good point! I will try this asap. It’s not the end of the world if i accidently save the template turning it into my most recent photo image instead of selection “save as” simply because the template is so easy to recreate, but it would be nice to totally wipe out the possibility of accidentally doing that. Tim
Hi Tim,
Thanks for writing this. One comment I have is that, for the family photo, future generations might appreciate having last names included, along with the family relationships shown. Another is to positively, clearly identify who is who in the photo, as you did in the shot of the band. In the baptism shot, whose grandmother is “Grandma Hannah”? Is she Baby Jean’s Grandma? Timmy’s? Dorothy’s? Hal’s? Is Timmy the boy or the man? I can appreciate you may have deliberately omitted this information in this example shot for privacy reasons and that’s OK. However, somebody two or more generations in the future who might find this photo, may not know who’s who, especially if any of the people’s names are repeated from one generation to another as often happens in some families. The only people clearly identified in this example are Baby Jean and Dorothy, since there’s only one baby girl and only one woman. However, if Dorothy’s name had not been clearly feminine, e.g. it had been something like “Toni”, which could be either feminine or masculine, although most guys would likely spell it with a ‘y’ instead of an ‘i’, things could have been confusing for anybody who doesn’t actually know these people. You might have used something like “Mother Dorothy holding Baby Jean, next to son Timmy and Father Hal , upon returning from church in 1972. They are sitting in Grandma Hannah’s living room “. Such information would eliminate some confusion for future generations researching family history and genealogy. If the photo were to eventually find its way into an antique shop, or somehow end up being found in an old book bought by somebody not connected to the family, it would give some clues to the finder who might be willing to return it to the family. As a member of one genealogy group’s Facebook group, I recently read a post about somebody who had found several personal letters stashed in a book he’d found in a batch he’d bought at a thrift shop and was looking for anybody who might know or recognize the names of the letter writer and the recipient so the letters and book could be returned to the original owning family or their descendants. This amount of detail is likely unnecessary for the current generation, but since the whole idea of adding the caption as a visual part of the image is to preserve the information, why not add the extra details when they’re known?
Terry, any image editing program that works with layers should be usable with this concept, although you might need to work from scratch since not all programs let you use templates. Most image editing programs, even many free ones, let you ‘Enlarge Canvas’ (or a similar option, often found under the “Image” menu. To do so, simply look at the current image dimensions (File Info or similar wording), given in Pixels, then add at least as many pixels to the bottom as there are in the existing image. For example, if the current image is 768 pixels tall by 1024 pixels wide, add at least another 768 pixels to the bottom. With the enlarged canvas, simply select your program’s Type Tool, and type in your caption text. If you find you have too much blank space left after you’ve finished adding text, crop it off. If you need more space, just repeat the Enlarge Canvas step to add more space. As Tim suggested, if you’re working with a portrait format image, it may be better to add the extra space to either the left, or more likely, the right side instead of to the bottom. In this case, add at least the width of the existing image. Then add your text, enlarging the canvas more if needed or cropping off excess space when you’re done.
Thanks Art, I totally agree. Originally I was in the mindset of “left to right” assuming people would know who is who. but full last names and greater detail would be really usefull. With the template, I could make the comments part larger and maybe the text smaller as well. That way I could fit more info on the picture. Thanks again and good point. Tim
Thank you for sharing your process using Photoshop templates. With my upcoming project, I have been contemplating a somewhat similar process although Photoshop is not currently one of my applications.
I agree completely with the need to be able to make the comments part of the picture not the metadata. I would like to add one more reason for doing this. Many programs make it impossible to utilize the metadata in the way I want. I don’t know of any programs that allow you to capture several lines of data like your examples. In addition, I have not found any programs that support the creation of files containing captions to export to something like Facebook or a book publishing program, and to include captions on both printed and slide show photos.
Your technique is much needed. It is so easy to crop out the comments later if you don’t need them.
I hope to develop a similar process without using Photoshop.
Thanks Terry for you encouraging words! i do believe there free programs that copy photoshop such a Gimp. Tim
“I have not found any programs that support the creation of files containing captions to export to something like Facebook….”
Picasa makes it easy to add captions, which are displayed on their own slideshow and video creation functions. More importantly, when you export from Picasa, the captions are included in the metadata and will automatically display in Facebook albums when viewed on a computer or on portable devices. Unfortunately, Picasa is no longer supported by Google. Google photo albums also accept the metadata captions but display them only on a separate screen when viewing on portable devices. Many other programs just ignore the captions; this is very puzzling to me. I believe that text information can be extraordinarily important to add meaning and significance to a photo.