BritePix Review: The Ultimate In-Depth and Personal Photo Scanning Service Review

Update: Some time after this article was published, Britepix merged with ScanDigital.
[dropcap]I[/dropcap] love that we have scanning services out there because I think it would be ignorant of me to assume every one of us with a collection of prints, negatives or slides, who wants a digital version of them, is willing to scan their own photos by hand.
But, for me, it's always been a hard transaction to consider — this whole idea of sending my irreplaceable photographs to a company or someone I have never met and expect everyone who handles them to care for them the same way I do.
If I were watching them scan my photographs, here is how the dialogue might sound:
“Excuse me BritePix technician. Hi! Um, could you like, um, put those cotton gloves on when you handle my photos? Please. Yeah. Um. No. How about the thicker ones. Over there. Yeah, those. Sorry.”
Okay maybe I wouldn't be that bad. The thinner gloves would have been just fine. 🙂
So with this in mind, let me say, doing this review was a big — scratch that — huge step for me. This was the first time I have ever sent any of my family's photos to a scanning service — or even out of our sight.
And I would be lying if I said I wasn't extremely nervous every step of the way until I got them back safely.
A little secret between you and I — even though I only ended up sending out a couple dozen photos for this review, just to test them out, I still pre-scanned all of them just in case something went terribly wrong.
Is that wrong!!? I rationalized it sort of like those of us who brush our teeth before we go to the dentist for a cleaning. Right? Probably not at all the same thing is it?
There Are Lots of Scanning Services — Why Review BritePix?
This past year, I've gotten a fair amount of search traffic on my website for this one company — BritePix. Maybe it's just the luck of the dice with Google, or maybe a legitimate amount of people really are interested in a thorough review of this scanning service. Either way, I thought it was fitting to make them my first review.
My Goal With This Review
I want to present you with the entire experience of what it's like to place an order and send your photographs to this company for scanning. It's not going to be a tons of computer “technical information” that would probably mean absolutely nothing to you. Instead, it's about the process.
I will present you with everything I learned that you will need to know to attain the best results from your photos with BritePix.
Also, I will inform you of the quality of customer service you should expect from them every step of the way — from placing your order on the website all the way through delivery to your front door.
Sending your photos out is a big deal. It's fun, it's very rewarding, but it can be scary at times. These are your irreplaceable photos, and you have the right to be overly cautious. I certainly was!
I feel obligated to reveal everything to you — the positives as well as negatives. But, concerns are very subjective – what could be upsetting to me may seem unimportant to you. Or it could end up being the other way around. By showing you a detailed account of my entire experience, you will be able to have a reaction to every point and decide how you personally feel about them — good or bad.
I just want you to have a good experience when using this or any scanning service.
And lastly, I want you to know I will be quoting specific paragraphs and posting links to some specific pages on their website. Please be aware that at any time, they may update their website or the way they operate. But, I am taking this chance so that I can give you an accurate account of what the experience was like at the time I placed my order.
After reading this review, if you have any questions for me, please feel free to ask me in the comments below and I will do my best to answer them for you!

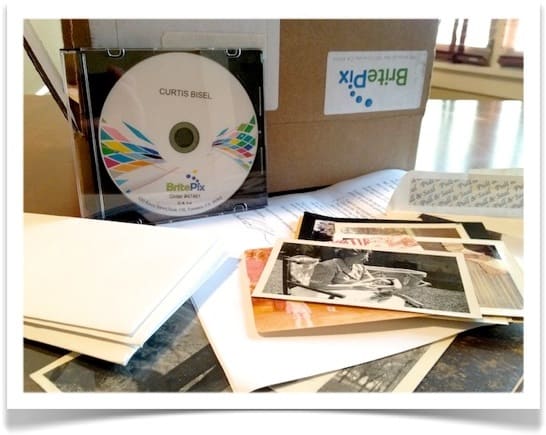
BritePix is a one-stop-shop that offers its customers an easy way to convert their photos, slides and negatives to CD and DVD.
You fill an appropriate sized cardboard box with your photographs, complete and print out their online order form, and then mail everything to their shipping address. After their technicians hand-scan your memories, they will mail your originals back to you in a new cardboard box with a shiny new CD,DVD or optional Hard Drive, filled with your photos in a digitized format.
You can place an order internationally, not just from the United States. And even though I won't be covering it in this review, they also offer video and film transfer services.
1 Navigating Their Website

After spending just a minute or two on their website, it was obvious to me they are trying to make the process of scanning photos as simple as possible for their customers. It's geared for normal people who have little interest in knowing the technical mumbo jumbo their scanning technicians need to know.
For example, instead of expecting you to know the difference between scanning at 300 or 600 dpi and which setting you would prefer them use, they try and focus your attention on choosing between having your photos scanned at “normal” or “high quality.”
They have a “How It Works” page that walks you through the minimum amount of information you would need to know in 6 steps. However, if you are interested in learning a little bit about the technical process, under this same tab labeled “How It Works” are several more detailed and thorough pages of information.
The most important page is called “Resolution, Pixels and DPI” which explains the basics of resolution and how the dpi you will choose is going to limit what you will and will not be able to do with your scanned photos.

Scanning Prices
BritePix has two pricing pages; one for photography and one for their video and film services. For photos, their pricing is kept really simple and is modeled on a per photo basis. This model is pretty standard when technicians scan your photos individually by hand on a flatbed scanner and not in a bulk-fed scanning machine.
This chart reflects the pricing at the time I placed my order:
| BritePix Photography Prices (Summer 2011) | ||
|---|---|---|
| Sizes | 300 dpi | 600 dpi |
| Prints | 50¢ | 65¢ |
| Prints (in album) | 70¢ | 85¢ |
| Prints (8″x10″ to 12″x17″) | $1.80 | $2.80 |
| Sizes | 2000 dpi | 4000 dpi |
| 35mm Slides | 70¢ | 85¢ |
| 35mm & APS Negatives | 60¢ | 75¢ |
Additionally, for those with more unusual needs, they offer processing of scrapbook pages, 2.25 inch slides, stereo slides, 110 film, 126 “Instamatic” & 127 film, medium format film and large format film & transparencies.
They accept all major credit cards — no checks, cash or money orders.
Services Included in the Price
As your photos have aged, it's very likely their colors have shifted as well. For example, many of my family's color photos from the 1970's are almost red now — hardly a lick of blue! You certainly can't expect miracles to be performed, but you will be happy to know that with scanning services, you will almost always receive basic color balancing that will most likely get all but the most stubborn photos back to looking good again.
BritePix is no different. Every one of your photos will receive their basic photo enhancements which include: image rotation, cropping, red-eye removal and color and contrast correction.
They have a nice page on their website that explains their photo enhancements with before and after photos that should give you an idea of what your expectations should be.
Minimum Order
For most people, knowing how small of an order you are allowed to place probably isn't very important. However, I knew I could produce a good review of their services for you by sending them just a couple dozen photographs.
I looked all over their website looking for their minimum order amount and couldn't find one listed.
At the risk of having my order returned to me, I emailed their customer service department and received a reply back the next day. They do have one, but it's a very respectable $5 (USD).
2 Choosing Photos To Be Scanned
So now that you know all about the company and how the process is going to work, you're ready to gather all of the photos you would like to send out.
Since all of their pricing is à la carte, there's no incentive to send a set quantity of photos that a bulk-scanning service may require — such as 2000 photos scanned for a set amount of money. So, it's really up to you if you want to possibly break up your collection into a few separate orders or send them everything you have all at once. Or maybe you want to get your collection narrowed down to a set amount of photos that will add up to a certain amount of money you want to spend.

I'm not exactly sure how I came up with 28 photos for my “test” order. I think it was a cross between an amount I wanted to spend and also including at least one or two photos from a variety of different examples I wanted to test them with.
For example, I wanted to test them on 8″ x 10″ photos as well as 5″ x 7″, 4″ x 6″ and 3 ½” x 3 ½”. I wanted to evaluate them on color shifted photographs — where they are have turned red or yellow. I wanted to send them some film negatives and slides, color prints as well as black and white ones. I picked out prints with borders and prints with rounded corners — heck I even added a Polaroid to the mix!
My minimal order for this review needed to represent all the tough areas that could possibly be a part of your entire collection.
3 Filling Out the Order Form
The next step is to fill out their online order form which is as simple as clicking on the big green “Get Started” button at the top of almost every page on their website.
You will be taken to a new page that will focus 100% of your attention to checking a few boxes for the type of services you want performed and filling out the required fields with your mailing address and payment information. You fill it in, print it out, and include it on top of your photos before you tape up the box.
Like the rest of their website, this order form excels at keeping things simple — almost to a fault — and gives you the confidence in knowing that you are making the right decisions for your photographs. And if you do have any questions, at the top of the order form they offer their help by providing you with their 800 number and email address.
Here are the few choices you will be making on the order form:
Choosing Scanning Resolution
Choosing which resolution you want is the toughest question on the order form and they get that one out of the way immediately. It's all downhill from there!
 If you put a check next to “Photography” indicating that you are sending them prints or film, you then just have to choose between the two levels of scanning quality I mentioned before.
Would you like their “Normal Quality” resolution (which they marked as “recommended”) or their “Highest Quality” which they state is an additional $0.15/scan. The difference between the two services is all in the dpi (dots per inch) they set their scanning software to.
With their Normal Quality, you get 300 dpi for paper photographs and 2000 dpi for slides and negatives. But with their Highest Quality, you are upgraded to a more “archival” safe 600 dpi for paper prints and 4000 dpi for your slides and negatives.
If you have a hard time making up your mind, even though the order form doesn't have any “pop-up” style help, their FAQ page does offer advice when choosing dpi. Here is what they say for paper photos:
[it] depends on what you intend to do with your pictures. If you want to print with good quality at original size, then 300 dpi is your choice. If you want to enlarge and print, or zoom in on an object, then you should choose 600 dpi. Remember, the larger the resolution, the bigger your files will be, and the slower it will be for computers to process them or to travel over the internet. The same principles apply to slides and negatives.
Cost aside, I don't feel a large image or file size of a photo is really an issue anymore at the rate faster processors and higher and affordable amounts of system ram (memory) are coming out.
If you want to email or post these larger files on a social website, just send them out through your photo manager of choice and it will magically reduce the resolution and file size for you almost instantly. This way you can archive a high resolution version but know you can send a smaller copy to whomever and whenever you want.
Another way to look at this decision is that for the extra 15¢ (USD) charge, you will have the peace of mind knowing that you got the best. If you later decide you regret your decision, you will have to re-scan them all at full price. Ouch!
I advocate on this website, when choosing a dpi, to be proactive and always think like this is first and last time you will ever get to scan your photographs. So, I opted to have my test photographs scanned in the “Highest Quality.” And frankly, I should be reviewing what I recommend — right?
Choosing the Delivered Media Format
 You have the option of having your digitized photographs saved to either a CD, DVD or an external hard drive. The first CD or DVD is free. After that they are $10 a piece. The hard drive option, which is really only useful if you are scanning a huge amount of photographs (or film or video), will set you back $119.95.
A nice touch they added is a line in the media section for us to type in a “Media Title.” It defaults to your name, but you could add a custom one if you would like. I'm assuming this will become the name printed on the top of your DVD of images, or presumably the name displayed for your hard drive when it's connected to your computer.
If you were to place multiple orders with them over time, this would be a great way to distinguish between the physical discs. For example, you could title it with the date you placed each order.
Choosing Shipping Method
 Their standard return shipping fee is $10, which is added to each order upon completion. This covers getting your DVD and original photographs sent back to you. However, how you initially get your photographs to them is your choice.
To keep with up with their approach at simplicity, they recommend you select their UPS Ground flat rate deal for $10. And there are some advantages to this:
- Because it's a flat rate, you can use any size box and send any amount of photos for the same price. Those with large and heavy boxes will come out ahead with this offer!
- No need to take your box to a UPS store to measure and weigh it — Call them and they can pick it up from your porch.
- You won't have to fill out a to/from label for your box — you just print out theirs and tape it to the top of the box.
Additionally, they say on their website that “We recommend using our $10 UPS Ground option because our site is integrated with theirs and we will be able to track your package from your door to ours.” What this means is when you sign into your account on their website, you will be able to click on the tracking code next to “Incoming Package” on your Order Details page and track your package.
This isn't a necessary perk, but it did seem like it would be nice to have both pieces of tracking information all in one place. And who knows, I optimistically thought maybe they would use this tracking information to plan for the arrival of my order — like a hospital expecting an ambulance with injured passengers in need of care. 🙂
Besides Ground, you can also mark Next Day Air ($45), 2nd Day Air ($22) or Self-Ship (Free).
Of course self-shipping won't be free — as in no cost to your wallet. This just means the amount won't show up on your BritePix bill. You will then be responsible to pay for shipping and any options such as delivery confirmation and insurance “out of pocket” when you take it to your local shipping service of choice.
Even though I knew my small test order of photographs would probably cost less than $10 to ship if I mailed it myself, in order to test out the average and suggested method that a customer like yourself would probably choose, I went with the flat $10 UPS Ground.
Special Instructions (Additional Services)
If you have basic goals for your photo collection, then you will probably be very satisfied with the standard options that are presented on the order form. But, if your needs are more on the advanced side, or you have special needs, then you might want to consider adding some additional services to your order.
You will only find these additional services by studying the information pages on their website — mainly the FAQ page. What they all basically say is BritePix can pretty much do anything you want them to — you just have to ask nicely. And by nicely, I mean there is no boxes to check or options to circle. You have to know what you want and type it out in the “Special Instructions” space near the bottom of your order form.
Tiff File Format
With the pricing I listed in the above chart, you will receive a DVD full of your images saved in the JPG file format using the “high quality” setting. But, if you pay an additional 20¢ (USD) per scan, you will receive a second scan of the same image but saved in the more “archival” friendly TIFF format.
We usually scan to the compressed JPEG format with high quality. This format is compatible with practically every image viewing and editing software application on earth, and being compressed, takes much less time to be processed by computers and other devices like DVDs. Upon request, we can scan images as TIFF files, but they will not come with our editing services. If you would like to receive edited JPEG files and unedited/raw TIFF files, we can do that for an additional $.20/image.
So what's really cool about this, is you will get 2 versions — a compressed but enhanced JPG file as well as an unedited uncompressed TIFF file. The JPG files will be perfect if you are just dying to get these pretty-looking (enhanced) photos up on the latest social networking site, and the larger “raw” TIFF files are the best to safely archive away in your photo manager.
Okay, so even though I know in the back of my mind their whole ordering process is geared to the average person with basic goals for their photo collection, I can't believe they don't even list the TIFF file option on their order form with a box to check. If you have been reading my posts very long, you know I just love saving and “archiving” scanned photos both “raw” and in the TIFF format.
It could even be highlighted as an “advanced” option at the bottom of the form, but just put it on there. By burying deep within their FAQ page, it's almost seems as if they don't think any of their customers would see the benefit in having our photos saved without any detail lost by either compression or the limitations of today's enhancement tools.
I didn't even think twice about adding this additional service. If you truly want to preserve your collection to the fullest, and can afford the added cost, I would highly suggest you add the additional Tiff files option to your order.
Film Grain, Noise Reduction & “Raw” Images
If you want to perform the image enhancements yourself, you can opt out of their free basic corrections and leave your scans without enhancements – basically “raw.” Also, you can request they use a technology called Digital Gem that could help reduce film grain and noise on your slides and negatives.
For my test order, I opted into this additional technology. I wrote in the “Special Instructions” field, “Please use Digital GEM whenever you feel it appropriate.”
Advanced Image Correction
In addition to the basic image enhancements that come free with every scan, you can request more attention to your most damaged photos:
All of our scanning services include basic enhancement services for all pictures. This includes rotation, cropping, and color correction. If your photos need a more advanced correction, we will be happy to give you a quote for those services. You may call us toll free or contact us by email for further information about enhancement services.
For this review, I did not ask for any advanced image corrections.
4 Packing the Box for Shipment
 So, I think it would be fair to assume most people would consider the process involved with packing your photos into a box to be an afterthought. I mean, how complicated can it really be?
BritePix's website does a great job of nicely explaining their Shipping Instructions — how to organize and safely package your photos before shipping them out.
Basically, they just want you to separate your negatives, slides and prints and group them in a meaningful way. Then place them envelopes and possibly protective wrap to ensure they aren't bent or jostled during shipping.
Before you do this though, there are a couple things to take care of that are easier to do beforehand rather than after:
Filling Out the “Estimated Count” Sheet
At the end of the ordering process, there is a request that on a piece of paper, you write out a rough count of how many of each type of photograph you are sending them and include it at the top of the box. I can only assume this will end up being sort of like their version of triage in an emergency room — it will likely help them get your order to the right department, in the right order, and to the most qualified scanning technician based on the order's requirements.
But, as useful as this information must be to them, it seems to me like they should ask for this information on the order form.
Smartly though, getting me to place the order first before committing to a specific number of photos — and thus a certain dollar amount — I'm more likely not to back out of the ordering process from the “sticker shock.” And maybe I will even be compelled to send them more of my collection as I realize how empty the box seems when I'm packing it!
Also, when I was writing this estimate count out, I felt that feeling you get when all the checkout lanes at the grocery store are really long and you end up scanning your own groceries, but you still have to pay the same price as when a checkout person does it for you. But, I figured if it would help expedite my order quicker in processing, it was worth 5 more minutes of time.
If nothing else, it will insure that you have an idea how many photos you are putting into their temporary custody. This way later when they ship them back to you, there won't be that possibility where you're thinking to yourself, “I could have sworn I sent them about 700+ photos — way more than the 523 I got back.”
Caution: Make sure you make a copy of this sheet for yourself because you won't get this sheet back.
(Hint: For the lazy — take a picture of it with your camera phone)

Special Order You Want Your Photos Scanned
 There's hardly a better example of how scanning is only part of the entire process of digitizing your photo collection as to the realization you come to when you discover how much work it is to organize your photos.
The end goal for most people, I'm finding, is to have all of your digital images in chronological order and then by the event.
And some of you might even choose to do this with your originals before you send them out to be scanned. If this is you, you will appreciate that BritePix can and will scan your photos in the same order they receive them.
On their FAQ page, they state in the heading of “Mail us your pictures Questions“:
You may include a piece of paper containing clearly printed instructions regarding your material, such as special requirements, certain groupings, or specific images to be scanned or omitted. If you want your photos, negatives or slides to be scanned in a particular order, please have them physically arranged accordingly
And later in “What order will you arrange your photos on [my] disk?“:
We will scan and save your photos in the same order you send them to us. You should arrange your photos by theme or event in smaller batches and band them together if you would like the digital images foldered in a similar manner. You may also number each photo or mounted slide on the back with a graphite pencil and include a note asking us to follow these numbers when scanning. You can also include a clearly printed piece of paper with special instructions for us to follow.
Honestly, because this was a very small “test” order for me, the order in which they were scanned and saved to disc really made no difference to me. But, because this is a review to see how BritePix will handle your photos in a real-world scenario, where possibly maintaining an order is very important, I decided to create an order to my photographs that I could hold them to.
I took 15 of my photos and gave them each a number. I wrote each number on the back of a small sticky note and then stuck it on the back side of each photo.

Now, I have something to admit to you. I felt really guilty when I was doing this. I'm sorry! But I did!
I kept thinking how perturbed the technician was going to be when they drew my horrible order out of the hat or however they divide up customer orders. I'm sure this person thought, “Ugh! Another pretentious small order. Who cares what order these 18 photos are in! How lazy is this person!??”
Organizing Photos in Bundles or Envelopes
Since my order was so small, I managed to get all of my film and prints to fit into 4 standard sized envelopes. I separated them by type — prints, negatives and slides. On the outside I wrote what type was inside and how many of each — such as “Slides – 6” or “Prints – various sizes – 15.”
I had a clear but fairly stiff photo sleeve available that I could ship my 8″ x 10″ and 5″ x 7″ photos in. (You can barely see it in the photo below) Otherwise, I would have used a 9″ x 12″ brown shipping envelope (with the little clasp) to protect them.


Printing Shipping Label
Since I opted for the $10 (USD) flat rate UPS ground shipping, I was able to print this prepaid shipping label myself and tape it to the outside of the box.
BritePix Address Problem
It was this point when I realized the shipping address on this label was different from the one on the “How It Works” website page under Step 2 – “Package & Send.”


So I looked on their “Contact Us” page for clarification — no address was listed. In fact, I couldn't find their address listed anywhere else on the website. Not even down at the bottom in the footer of each page.
Say what!? Very strange isn't it?
At the time, I felt it was pretty safe for me to assume the address on the UPS (generated) shipping label must be the correct one. Right?
But why would they list a different address on their international website page? Was that a “webmaster” mistake that's been overlooked for some time now?
I think this was a genuine concern I had — I mean I could possibly mail my photos to the wrong address. They could be delivered to some mail facility, signed for, but then not returned to me. And even if they were, I would lose time waiting for my box to go to the wrong place and back. (Uggh!)
I did some Googling to see if I could find any other “hidden” pages on their site that might have their address written on it. I didn't find any there, but I was able to find a cached copy of their website from September 22, 2010. Under “Step 2” on the same “How It Works” page, their address is listed as “2053 N.W. 79th Ave. Suite 11975 Doral, FL 33122.”
I decided I couldn't take the risk, so I called BritePix on their 800 number. No one answered so I left a message on their answering machine. The next day I received a call from “Justin” who told me they were currently in the process of moving their facility from El Segundo to Torrance and apparently they hadn't updated their website page yet. And strangely, he said they had never been located in Florida.
Alrighty then! The shipping label was in fact the correct one. My package was ready to go — off to the UPS store!

5 Tracking the Scanning Progress
After you've dropped your irreplaceable photos off at a shipping facility, I can say it's very normal to be worried and therefore start asking yourself, “I wonder how long it will take before I get them back?”
How Long Will It Take?
I went back and did some more looking around on their website and found very little information. Near the top of their home page, I found a statement that reads, “BritePix garnered recognition from CNN Money for having the fastest turnaround in the photo scanning industry.” So that was encouraging.
And, on the day I placed my order, their FAQ page under “How long will it take to scan my photos?” stated:
Our current turnaround is 7 business days for jobs under 500 and 10-15 business days for jobs under 1000. Our turn-around times may vary depending on the number of orders we have in our system at the time.
Our Holiday Season is especially busy for us, and we may be processing orders at an extended length of time. Please contact us for larger quantities, or if you are working with a specific deadline/timeframe.
Tracking Your Order With Your Online Account
Once you have established an order with BritePix, you will be able to sign into your account on their website anytime that you want and track the status of your order.
At the top of the “View Details” page, is a box with information such as your personal contact information, the date your order was placed, received and estimated date to be completed. Also, you will find your outgoing package tracking codes (income as well if you signed up for their UPS flat rate service).
And then, below this, is the really cool part. They have a graphical display they call the “Essential Tracker Status” that will let you know what stage your photos are in during all of processing. From left to right, the blocks turn from orange (to be completed) to yellow (in progress) then finally to green (completed).
“Door to Door” Timeline
I now know what it feels like to mail off irreplaceable photos from my family's photo collection. It can be a little unsettling while you wait to get them back. You're asking complete strangers to care for them like you do — and that's going to be a leap of faith for many of you out there I'm sure. So, with that in mind, I want to continue to be very transparent with you.
Here is a daily account of what happened with my order from the day I dropped it off to be shipped, to the day it was delivered to my front door.
|
1
|
JUL 14 |
Online Order Confirmation [Email from BritePix]
Dropped off box at local UPS store |
|
|
2
|
JUL 15 |
Delivery Failed – [UPS records]
|
|
|
3
|
JUL 16 |
BritePix Accepted Package – [UPS records] |
|
|
5
|
JUL 18 |
Shipment Received – [Email from BritePix]
|
|
|
7
|
JUL 20 |
Order Inventoried & Prepared for Processing [Email]
|
|
|
9
|
JUL 22 |
Welcoming Message From Britepix – [Email]
|
|
|
42
|
AUG 24 |
BritePix Started Scanning My Photos – [Email]
|
|
|
50
|
SEP 01 |
BritePix Shipped My Order Back to Me – [Email]
|
|
|
55
|
SEP 06 |
UPS delivered box from BritePix
|


My Thoughts On Their “Current Estimated Turnaround” Times
Personally, when it comes to scanning a family's photograph collection — and most likely they will be scanned once and only once — I don't think “the faster the better” should ever be said.
Like services performed at a barber shop or a salon — a straight razor shave, a haircut or a massage — I would prefer it be done right and take as long as it needs to take.
But, regardless of how long it ends up taking, I feel a scanning service has a responsibility to let the customer know ahead of time an estimated period of time they think it's going to take and let them know what's happening if it goes longer.
When I placed my order, because it was the middle of the summer here in the States and not a holiday period, I was under the impression it would take about a couple weeks based on what they said was their current turnaround time for orders under 500 photos. And that includes the couple days extra for shipping each way (since I live in California fairly close to them).
So, I will admit I was a little bit surprised when I received the email from them 2 days after they received my photographs that said they estimated my order would take 4 weeks — especially if I tried to convince myself having only 28 photos was relevant.
Can You Get Faster Service?
Now, to be completely fair here, they do state in the FAQ and in this email that:
If you have a specific deadline for your project please contact us and we will work to accommodate your timing.
So, I could have called or written them back immediately and — in my case — made up something like I was in a hurry to get them back so they can be in a post-wedding slide show video a few weeks from now. If I had done this, it's possible I could have gotten them back in my requested time frame.
However, I decided that because my order was placed specifically for this review, I didn't want to interfere with the natural process because of my own impatience. For you, I wanted to get a true reading of how long they would take on their own unaffected schedule.
If you are the type of person with high “customer service” expectations and want to hold a company accountable to everything they say — including their “best guesses” — you might be disappointed by how long BritePix might actually need to turnaround your order because:
- It's possible their “current turnaround time” is way too aggressive — especially since that FAQ probably isn't updated often. (Maybe they do that on purpose to help insure you aren't scared away from shock when you find out how long it really takes to hand-scan photographs)
- It's possible once they receive your order, they will estimate a specific return shipment date only to go past it.
- And it's possible, they will fail to call you or even send you an email apologizing for not making their estimated shipping deadline, and explain why it's taking them longer.
But, if instead you go into this knowing that this isn't an exact science, and every order in front of yours is different with unique customer-given instructions and challenges, you will be able to relax and not watch the clock feeling like you are owed your order to be delivered on a certain day.
6 My Photos Arrive From BritePix

Opening the Box:
I was actually really excited to open the box!
I guess since this was the first time I used a scanning service, I had no idea what to expect inside. I would have been happy with anything I suppose as long as all of my original photos were in there and were well cared for.

A small crumpled wad of brown paper at the top held my photos tight inside the box. Below was the DVD, an “Appreciation” letter from the team at BritePix, a UPS return shipping label, as well as a full page itemized receipt of my order.
(Note: Interestingly, their Torrance address was printed at the bottom of the receipt and the DVD.)
All of my photographs were returned in the same envelopes and sleeve that I shipped them in. The white envelopes were held shut with white paper tape. It's funny, I can't remember if I put them on there or they did. I have paper tape just like that.
Upon a quick flip-through inspection, all of my original photos appeared to be there and in the same condition I sent them in.
Wahoo! That was a load off!


What's On the DVD
I must say, the little bit of undiagnosed OCD in me that I always joke about — yes, as in Obsessive Compulsive Disorder — really appreciated their logical method of organizing and labeling the images.
Worst case, they could have thrown all of the images in one giant folder. That would have been such a mess! But, I bet it's possible there is a service out there that does it that way! (and I'm gonna rat you out when I find you!)
Folder Organization and Filenames
Because I paid extra for (uncompressed) TIFF files as well as compressed JPEG's, they created 2 main folders on the DVD. One simply labeled “Jpeg Format” and the other — yup you just guessed it — “Tiff Format.”
Then inside them, are two or three additional folders to separate the film from the (600 dpi) high resolution prints I had them do for me.


Filename example: “47461-HRP-E2-001.jpg”
The filenames they chose to label each image with is appreciated. For example, for the ones in Envelope 2, they started off each image with my unique BritePix order number. Then, they added “HRP” for High Resolution Photo. After that “E2” for envelope 2 and then a 3-digit index number counting from 001-015. Ingenuously simple.
Scanning Order – Did They Follow My Instructions?
So, I was lazy and didn't write down the order I put my 15 photos in with those sticky notes before I shipped them. But instead, I used my cell phone and recorded a 5-minute video as I flipped through each of them front and back.
I just loaded up the Quicktime video on my computer and compared it to the order of the 15 images they scanned for me. Sure enough, all of them are saved and labeled in the correct order.
So thank you once again Beatriz or whoever scanned my annoying 15 prints in order — I personally thank you!
File Sizes and Bit Rates
This is kinda technical and geeky — so you may not have any interest in knowing any of this data. I'm providing it for those who love this type of stuff. It's possible though you may want to use the file size information below to try and get an idea how big their entire collection might end up being on your hard drive.
After comparing file sizes of my scans from BritePix and doing some test scans myself, it appears that all of their color prints and film are scanned at 24-bits. Sometimes this is referred to as 8-bits (per channel – rgb). Most high quality photo scanners will scan up to 48-bits if you think there is enough color information to warrant it.
| BritePix Scans — Pixel Sizes /File Sizes (All 24-bit) | ||||
|---|---|---|---|---|
| Print Sizes | DPI | Pixel Size | JPG File Size (Aprox) | TIFF File Size (Aprox) |
| 3 ¼” x 3″ | 600 | 2028 x 1872 (3.80 MP) | 1.11 MB | 10.86 MB |
| 3 ¼” x 3 ¼” | 600 | 1836 x 1859 (3.40 MP) | 1.17 MB | 13.95 MB |
| 3 ½” x 5″ | 600 | 2964 x 1991 (5.90 MP) | 1.21 MB | 16.88 MB |
| 3 ½” x 4 ½” | 600 | 2544 × 2052 (5.20 MP) | 1.30 MB | 14.94 MB |
| 2 ½” x 4 ¼” (b&w) | 600 | 2507 x 1422 (3.60 MP) | 1.32 MB | 3.81 MB |
| 4 ½” x 6 ½” | 600 | 2664 x 3913 (10.4 MP) | 1.52 MB | 30.27 MB |
| 7 ¾” x 10″ | 600 | 4559 x 5891 (26.9 MP) | 4.56 MB | 76.84 MB |
| Film Sizes | DPI | Pixel Size (mean avg) | JPG File Size (mean avg) | TIFF File Size (mean avg) |
| 35mm Slides (JPG) | 4000 | 5233 x 3550 (18.58 MP) | 3.62 MB | — |
| 35mm Slides (TIFF) | 4000 | 5782 x 3946 (22.80 MP) | — | 65.49 MB |
| 126 Negatives | 4000 | 6391 x 4273 (41.10 MP) | 6.21 MB | 123.84 MB |
I made an interesting observation when I was putting this chart together. My 2 ½” x 4 ¼” black and white print has a really small TIFF file size compared to the others. This is probably because it was scanned in “8-bit grayscale” mode. This produces a much smaller file size because the extra color information isn't recorded. Another one of my b&w prints appears to have been scanned in 24-bit color mode, so maybe they are judging which ones they think will benefit from recording more information.
If you prefer all of your black and white photos be scanned in the color mode (which some experts suggest), it's possible BritePix will do so if you ask them to in the “Special Instructions” section on your order form.
Image Rotation (TIFF Files)
When I got the images into my photo manager Aperture, I noticed 9 of the 28 TIFF files needed to be rotated counter-clockwise. I guess it just depends on how they are placed in the flatbed as to whether it's correctly rotated or not.
I assume the reason for this is their TIFF files aren't supposed to include any kind of “editing services.” And a rotation is considered to be an editing service.
But, It's really no big deal at all. It's just a simple button press in your photo managers/editor on each one. This is just something I want “photo editing” beginners to be aware of if you decide to order TIFF files as well.

Judging the Image Quality:
Based on the information provided on their website, the only thing we know for sure about their quality control is that their scanning is performed by a “trained staff of professional graphic artists” using “high-end professional photo scanners to deliver the best quality scans in the industry.”
For slides, “we only use high-end professional Nikon slide scanners to deliver the best quality slide scans in the industry. We do not enhance digital slides in a batch process. Your slides will be individually enhanced with Photoshop.”
Additionally, I noticed in the metadata for my slides they were scanned with the Nikon Super Coolscan 5000 ED.
After looking over all of the images, I think it's fair to say they all have a nice level of added sharpening and overall exposure.
Color Correction
I was very pleased with the color correction that is part of the “basic enhancements” done to all (JPG) photographs. If I had any complaint, I would say to my taste, a few of them seemed to have a bit too much yellow or green left in them. But, most seemed to be right on.
And I must say, I truly gave them some challenging photos to correct — many of which had colors that were way shifted!


Bordered Prints
I purposely included several prints that have borders around them to see how BritePix would handle them.
It's a quandary I've been in since I started scanning my own photos. I personally think the borders add a lot to the photo — it's reminiscent of the decade they were printed and it's just how I remember these photos when I visualize my collection. They almost seem wrong to me when I see them with the borders cropped off! For this reason, I have been scanning all of mine with the borders completely intact so I can archive them this way. I can always easily create a new version in my photo manager and crop them out if I so choose.
BritePix took a more inconsistent approach. Sometimes they scanned them and left the borders, other times they cropped them. And even stranger, they usually didn't crop them out entirely, but instead cropped out one or two of the sides.
At first, I thought this was just to preserve handwriting or the date that was printed on one of the sides. But, once I really studied them, I couldn't figure out an obvious and consistent pattern.
(Note: All 5 of the photos below are the “corrected JPG” version)


Now, chances are good you aren't obsessively nostalgic like I am and couldn't care less about the printed borders.
If you don't care about them, it would probably be easier for you to have them removed entirely. This is because you will have more manual work on your end cropping off what's left of the borders. It's not hard at all — photo managers like Picasa and iPhoto make it very easy. But, it's still another step.
Now that I am aware of their workflow, I would suggest you decide whether you prefer to have the borders left on or off, and let BritePix know your wishes in the “Special Instructions” section of your order form. This way they will know to maintain a consistency with all of your bordered photos.
Digital “Defects” in Some TIFF & JPG Files
About halfway through my time analyzing my scanned photos from BritePix, I kept thinking I was seeing a mistake in one of my TIFF files. The eyes looked really funny in the one Polaroid scan of me as a boy. They looked like they were popping out of my head. But, since this was the “unedited and raw” TIFF file, I thought this had to be how the original print must look.
Finally, I couldn't take it any longer and zoomed in on it at 200%. This is when I noticed some digital “defects” as I call them. (Sigh)

Personally, I found this to be pretty alarming. Because, as you and I talked about earlier, the purpose of paying an extra 20¢ (USD) per scan to have the TIFF files saved out for you is to be able to preserve (archive) a “raw,” “unedited,” and “uncompressed” version of the scan. Think of these as your new digital camera negative.
You want it to be the best quality and closest reproduction of the original print or film that you can possibly achieve. This way, in the future, if you want to enhance the photo on your own with the enhancement capabilities that will be available on that day in the future, you will have an unaffected “clean slate” of a scan to work with.

To me, this TIFF is clearly not raw or unedited.
I spent some time in Aperture with the other 27 photos to see if they were affected as well. I blew them up to the full resolution on my 24″ monitor so I could get a good look at each one.
I couldn't find anything unusual on any of the 3 film negatives or the 6 slides they scanned for me. But, of the 19 prints, 5 of them had areas with digital “defects.”
That's about 18% of my prints.
Each of them had at least 2 places affected and a couple of them had at least 6 and 7 separate small “defected” places.


A while back, when I first started scanning my own collection, and I was trying to discover the best workflow, I had my Epson scanner software set to remove “dust and scratches” from prints during each scan. Even though I only had it on the medium or sometimes even the low setting, I still occasionally found digital “defects” like those above. This is because I was allowing the technology of that time to try and detect what it thought was dust or a scratch and digitally “remove” it on its own. When the software gets it wrong, the result can be a group of pixels that just look plain unnatural in their surroundings — distorted.
Sometimes the positive result of less dust makes it worth the risk of losing image detail. Other times, like in these examples, I believe it becomes a bad trade-off.
So, in the case of these defective images, my best assumption is that BritePix is scanning all prints with this same type of “dust and scratches” filter (possibly Digital ICE for prints) turned on with the hope of reducing the amount of dust and scratches that show up in your images.
And to make matters worse, these same “defects” are in the JPG files as well.
See, if done correctly, scanning technicians will perform a raw scan without any filters applied. Then, if a customer asks for TIFF files, the image at that point is saved out as an uncompressed TIFF file for them. Then they do all of their editing (basic enhancements) in another saved version of this TIFF file. When they are finished, they save out a compressed JPG version. If you asked for both versions, that original TIFF file as well as this “enhanced” JPG are copied to a DVD.
So, in the case of these BritePix scans, if this “dust and scratches” filter was turned on, not only is there a chance the original TIFF files will get digital “defects” in them, but the “defects” would then get passed on to the JPG version as they save them out.
That's why the best image enhancements are not performed automatically by a computer algorithm, but are performed by a trained technician using just their eyes, hands, and a “blemish” or “clone” tool in their editing software.
So What Should These “Defects” Mean to You?
The affected areas are so small and involve very few pixels when you consider the size of the entire image. If you were to print these images with the digital “defects” out on photo paper or in a photo book, it's likely the average person wouldn't notice any of them or even care very much if they did.
But, when the “defects” occur near a focal point such as someone's eyes or mouth (like the face in the above Polaroid), it will certainly increase the chances they will stand out and be noticed. Even more if you crop and enlarge a “defected” section of a photo.
Personally, this doesn't make me very happy. Dust and scratches are fairly easy to remove in an photo manager/editor and almost anyone can learn to do it. It just takes some of your time. However, what's not easy is recovering lost image detail — and these “defects” are just that. To me, it's just not worth the compromise.
If having even minor digital “defects” in your print scans concerns you, on your order form in the “Special Instructions” section, you could try writing something like this:
Please turn off any corrective scanning filters such as ‘dust and scratches' (Digital ICE) when scanning my prints. I would rather have minor dust and scratches than risk creating some areas with distorted pixels.
It makes me wonder now, do all scanning services use these “hit or miss” outcome type filters when they scan our photos? I guess I'll have to find out.
Red-Eye Removal

Sadly, I only gave them one photograph to remove that horrible red-eye problem we all have to deal with, so I can't judge them on quantity. And please know, it was a fairly tough one to remove because this Polaroid photo has little detail to work with, and the eyes in the photo are very small.
Taking that into consideration, I was still a little disappointed they went with a less effective method to remove the red-eye.
I think the best way is to isolate the red pixels and then pull the red coloring out by changing it to a different color — preferably near black. This maintains the original pixel structure but gets rid of the red.
The method BritePix used on this image was to basically paint over the red eyes with a dark but semi-transparent and almost round-shaped group of pixels. When it's done perfectly, it's hardly noticeable and is fairly effective. In the lesser cases, it looks like the subject is wearing two dark semi-transparent coins resting over their eyes. This is mostly due to the fact the circle is almost always made too big and is therefore covering some of the outside skin. Not good.

Dust and Scratches
Whenever you scan photographs, you invariably capture what seems like more dust and scratches than were on the original! It's just that your prints and film are like magnets for dust and then with the process of scanning, you are basically magnifying them.
Prints:
For prints, BritePix's included basic enhancements don't include removal of dust and scratches. So, this will be all on you to remove in your photo manager/editor if it bothers you.
The tools are getting to be so easy to use now, it's almost just a mater of selecting the correct “blemish” or “cloning” tool and click on the dusty and scratched area and voila! This is especially effective when performed in a non-destructive photo manager because you can always revert back to the original if you ever think you went too far with the enhancements.
Overall though, I really didn't see much dust or scratches on the enhanced JPG prints I got back from them. So, either my prints were fairly clear of them to begin with, or they do a good job at wiping or blowing off (with compressed air) a fair amount of it before they place them in their scanners. Additionally, it could also be helped by a “dust and scratches” filter used during the scan that we talked about earlier.
So, unless you think a good portion of your prints are really dusty or scratched, I wouldn't be too concerned. Most of the “enhanced” JPG's I got back were fairly clear. It's likely paying extra for their “advanced image correction” for dust and scratches won't be necessary.

Negatives/Slides:
Slides are different with BritePix because their scanning includes the use of Digital ICE that can be very effective at removing dust and scratches.
However, this technology isn't always as effective across all types of scanners that have it enabled. For example, sometimes I've seen little to no difference in the amount of visible dust and scratches when used on fairly inexpensive flatbed scanners I've tested.
If you look on their photo enhancements page, BritePix's before and after photos using the Digital ICE technology make it look like your slides and negatives will come back pristine with absolutely zero dust and scratches on them. I mean, it kinda looks way too good to be true. Seriously.
But, these film scans I got back from BritePix show me Digital ICE can in fact perform wonders when used on a very expensive dedicated slide scanner. If it's not the ICE, they are doing some nice manual “removal” work in Photoshop. Either way, I think you will be pleased with the results.
They are very clear of dust and scratches.
Here is another one of my friend's 35mm slides. (Thanks again Erik!) The first image is an unedited TIFF I scanned on my Epson V600 flatbed scanner right after I got the slide back from BritePix. The second is the enhanced JPG version that BritePix sent me. (Click on each one to see them larger)


Copyrighted Material:
If I had to guess, I would say that most families have some professionally taken family portraits in their photo collections. Because some places won't scan these prints or negatives without a “release of copyright form” from the photographer or studio, I made it a point to include an 8″ x 10″ image with an obvious studio watermark over the image.
In their Terms of Agreement, they state that you “Acknowledge that you are the owner of the copyrights to the photos you post or transmit to us, or that you have the permission of the copyright owner to post, transmit or mail the photos.”
As per their terms, BritePix scanned my image without questioning me. But, if you mail them copyrighted photographs, just be prepared to mail, fax, or email them a copy of your release should they ever request it.
Online Photo Gallery:
Due to major issues with their gallery servers, I wasn't able to access my online photo gallery until around the time I was finishing up writing this review. But, it seems to be up and running just fine now.
Under normal circumstances, my understanding is that after they have scanned your photographs, you will be able to view them online before your originals are mailed back to you. This is currently a service they provid at no additional charge.
In the Gallery, you can download all of your images, play them in a slideshow, arrange them how you would like, and share them with friends and family. They are initially ordered in the same folder structure as they are on the DVD they send you.
It's not as elegant and easy to navigate as many of the dedicated photo sharing sites such as flickr or Smugmug, but it's probably more than adequate for what you will need it for.

Final Cost of My Order:
So now comes the the part you've been waiting for — haven't you? — and that's finding out how much I spent on my big ol' bill. This order receipt was printed out and accompanied my Appreciation Letter at the top of the box they mailed back to me.
Because I ordered additional services, my order is a bit more expensive than I assume the average per/photo rate ends up costing.
I noticed they were very nice and fair and didn't charge me the full 8 ½” x 11″ rate for a print that was almost that size — closer to 7 ¾” x 10″. They just lumped it in with the others at the standard size print rate.
The initial shipping charges of $10 was immediately billed to my credit card on July 14th when I first placed the online order. The remaining balance wasn't charged until August 30th, which appears to be the final day the technician worked on my order.
| BritePix Order Receipt | ||||
|---|---|---|---|---|
| Summary of Upfront Amount Paid by Customer: | ||||
| Type | Resolution | Price (USD) | Quantity | Total (USD) |
| UPS Ground (there) | $10.00 | |||
| Amount Charged Upfront: | $10.00 | |||
| Summary of Charges Upon Order Completion: | ||||
| Type | Resolution | Price (USD) | Quantity | Total (USD) |
| UPS Ground (return) | $10.00 | |||
| Slides | 4000 dpi | 85¢ | 6 | $5.10 |
| 35mm Negatives | 4000 dpi | 75¢ | 3 | $2.25 |
| Printed Photos | 600 dpi | 65¢ | 19 | $12.35 |
| Tiff format of photos | 20¢ | 28 | $5.60 | |
| Amount Charged Upon Order Completion: | $35.30 | |||
| Total Amount of Order | $45.30 | |||
Final Thoughts:
This was the first scanning service I have used and I must say I'm pretty impressed. BritePix proved to me using a photo scanning service is indeed a viable option for anyone who wants to have their photo collection digitized but doesn't want to do the scanning themselves.
Scanning Quality
Even though I don't think they will win over some of their “advanced” customers with the highest of expectations, I think the average person will be very happy with the quality of their digitized photographs. All of my photos were returned in the same condition I mailed them in, the digital files were all organized and labeled extremely well, and the image quality and level of basic correction performed was very good.
Those wanting near-perfect “archival quality” scanned reproductions won't be satisfied with the minor digital “defects” I found in some of my photographs. I believe these are caused by a “dust and scratches” (removal) filter that's turned on during the scanning. But, hopefully they could turn that off if you request it.
Turnaround Time
I think BritePix is overly conservative about how long their entire scanning process takes. My order was only 28 photos and took 55 days “door to door” — quite a few more than the 7 business days plus shipping they quoted me from their website.
When they say “turnaround time,” what I think they mean to say (and should write on their website) is this is how long it's actually going to take for a technician to scan your photos. So this doesn't include the time it takes for your package to be processed once they receive it, and the time you wait in their queue for it to be your turn.
With my order taking longer than anticipated, I couldn't help but wonder if what I read on one website was true — that BritePix does the actual scanning in Costa Rica. However, I couldn't find any evidence of this on their website.
I am not opposed to sending photos out of the country for scanning. But, if this is the case, I would like to think they would feel obligated to let us know they are shipping our photos away from the location in California that we mailed them to. So, until I know for sure, I am going to assume they were just backed up with orders when they received mine.
It's probably safe to assume you will receive your order much sooner than had you scanned them yourself. So, just keep in mind after reading this that it could take a little bit longer than you might expect.
Hiding From Their Address?
As I was finishing up writing this review, I noticed their website was updated and currently no longer lists their address on the “How It Works” page. So as of publishing this review, it's not listed on their website at all.
However, it's not like they are hiding their address at all times. Their address is printed at the bottom of my DVD and order receipt. And after you place an order with them, you will start to receive occasional emails from them with their latest sales offers. They list their address at the bottom of each email. (Though this could be because commercial email in the United States is now required to include one.)
Maybe I'm in a small minority on this, but to me, not including an address on their website just makes me uncomfortable.
They are asking us to send our priceless irreplaceable (one-of-a-kind) family photos to a company we quite possibly have only seen and read about on the internet. They're not like our local store we drive by every day — that's tangible and makes us feel safe because we know how long it's been there and operational.
I really hope they change their mind at some point and re-post it.
Save $20 with this BritePix Coupon Code
In the appreciation letter I received in my shipment from BritePix, was a code that I could give to friends and family so they could save $20 (USD) when placing an order. I thought I would share my discount with you as well. Not only will you save a good amount of money, but I will also receive a $20 reward. It's a win-win for both of us.
Enter in the following coupon code on your order form: Rf3847461
You certainly don't have to use this code. There are probably some other discounts out there. But if you do, I want you to know I really appreciate it! And please write me and let me know so I can send you a personal thank you.
Short and Sweet Overview:
PROS
Helpful Website
Nice easy to follow information pages.
Simple Ordering Form
Great for “non-techie” customers.
Fantastic Flat Shipping
$20 shipping covers entire order there and back. Stress free and a bargain.
Order Tracking System
Nice online graphical system to show what stage your order is in during processing.
Excellent File Naming and Organizing
Superb file name labeling on DVD.
Good Color Correction
Majority of photos had very good color balancing.
Excellent Film Cleaning
Dust and scratches almost non-existent on slides and negatives.
CONS
Frustrating for Advanced Customers
Pro options available but only listed on info pages and not order form.
No Address Listed
Physical address nowhere to be found on website.
Delayed Turnaround Time
Estimated and actual shipment time was longer than quoted.
Inconsistent Scans with Printed Borders
Some photo borders were cropped, others not.
Digital “Defects”
Use of what seems like a “dust and scratches” filter during scanning sometimes creating digital distortions. Inferior red-eye technique.
Edited TIFF Files
Some TIFF files possess digital “distortions” when they should be unedited and “raw.”
So there you go, that's not only my first review of BritePix, but my first photo scanning service review ever.
Right in this area below, I am going to continue to add updates about this company should any come up. So, check back if you are interested in in more information about this company or this review.
If you have any questions about my experience with BritePix, please ask them in the comments below. I will do my best as always to answer them for you.
Cheers!
Update:
Shortly after publishing this review, I contacted BritePix to see if someone there could answer a few questions that I still had. I spoke with Koa Nu' uhiwa who handles marketing for the company. She was very nice and provided me with some great answers.
I decided to publish them here because I think you might be interested in some of this information if you are trying to decide if BritePix is the right fit for you and your photos.
So here they are:
1) Your FAQ for shipping recommends customers order using the $10 UPS ground option, but doesn't list any specifics whether or not this includes any kind of insurance. Does it include insurance, and if so how much does it cover? What would happen if [my] shipment was lost?
The $10 shipping simply covers the cost of shipping in the package and provides a trackable solution for the customer. It does not include any insurance but that is because it is fully tracked through UPS's system, and ours. We have it setup so UPS “talks” to our system and communicates all of the information.
UPS has never lost any of our customer's packages and we are confident they never will. We suggest this method over an outside option because that allows us to track the package with the customer.
2) Why does BritePix choose not to list their address on the website? The only place it's listed [at the time of my question] is on the UPS shipping label.
We don't list our address on the website because it caused problems in the past. Previously we listed it, but we received a lot of materials from customers who didn't place an order first. Some of the packages had very little contact information and in a handful of cases, we couldn't find out what to do with them and simply waited until the customer called/emailed us.
To avoid this unfortunate mess, we removed the address, and now customers are forced to place their order so they know where to send their package. Also, it ensures they have confirmation materials for their own use as well. It is a way for us to protect our customers and their materials.
3) What type/model# of scanners do you use for prints/slides?
For negatives and slides we use Nikon Super CoolScan 5000 scanners. For print photos we use Epson 4490 flatbed scanners. After months of testing, we determined that these scanners provided the most acceptable quality for our customers.
4) Are your technicians scanning our photos at your Torrance, CA address where we ship them, or someplace else?
All photos, slides and negatives are scanned here in Torrance, CA. We don't outsource work because we don't believe in shipping out customer materials and risk the chance of loss or damage overseas. The previous owner of BritePix sent orders to Costa Rica for processing, but once we took over operations, we stopped that and started doing all scanning work in the LA area. We believe this is the most effective way to manage our staff and take care of our customers' materials.
As you can tell, the answers to all 4 of your questions involve our customers' best interests. We understand the importance of their materials and value their safety. We hope that the hours we spent to perfect our systems and train our people result in a high quality service that makes all of our customers happy.

When was this review written? I can’t find a date. Also, I’m surprised you didn’t ask them about the digital defects in your scan. I would have been interested to know if they would offer to re-scan those for you.
Mike, this review was written in December of 2011. And that’s a great question about the “digital defects.” The order I placed was a small order, with 100% of the intention focused at testing the company for their quality of customer service and work. So, maybe since I knew I wasn’t using any of their scans for my personal collection I’m archiving, I wasn’t so much worried about making sure they “fixed” their work to meet my expectations, as I was just finding out how they would perform for any customer. (The order was placed without them knowing what it was for, and I used my real name and not my website’s)
But, what you brought up is valid, and I really wished I had thought of that. It would have been great to find out how their customer services played out when dealing with a concern or complaint about the quality of their work. I’m sure I was just so focussed on getting my (lengthy) review published that I wasn’t even thinking about how I could “milk it” for additional benefits to everyone — ha!
First, thanks for confirming when the article was written! It’s often hard when reviews don’t include dates to know how relevant they still may be!
It definitely would have been nice to know whether they could and would scan without whatever setting caused that problem, and how the quality would have been. Since you only saw the problem on prints, it sounds as if it could have been a setting on the Epson scanners that wasn’t present on the Nikons, but the sample size is too small to know for sure.
Anyway, Catherine’s comment above is pretty alarming. She says that BritePix ruined her photos. I sure wish there were more details on that, because it’s the one thing I absolutely cannot allow to happen!
Thanks again for the review.
Hi Mike,
They ruined photos with scratches, tape, and foxing. They asked me to prove it, but did not ask that I re-send the photos until five months later. “Justin” kept telling me everything I pointed out (including three separate requests for my address, followed by the assurance that they had mailed my missing disc after my first request) was “normal”.
If you are comfortable having your priceless photos gone for 3 months, some possibly ruined (but the technicians take “excellent care”… I guess if you say it, that makes it true?), and having no consumer recourse, perhaps this is the service for you.
Like the original reviewer, every single one of my photos was in envelopes by year. The three disks I received in return had no folders, different decades in the same disk, and no organisational strategy. Unless they have reformed significantly and “Justin” is gone (perhaps replaced by another false name), I would not use them. I also, in retrospect, would have opened the consumer complaint with AmEx before the period expired, whether or not the scans were delivered. The website says 7 days; the “confirmation” email says 4-8 weeks, during which they always seem to have unforeseen demand; and the actual delivery is at least 10 weeks. I paid three times for UPS ground… apparently each $10 is actually for “processing”; and the final missing disc was sent by USPS. The first time it was supposedly sent, it was “lost in the mail”. The second time, I got it only 10 months after my original order.
I cannot now find any online record of my order or any archive of the photos. And I never received the advertised link before my photos were finally returned.
They state they have satisfaction guaranteed. For me, they strung out the response process for so many months that I could no longer file a credit card dispute, then claimed that 1) their email system hid my emails (selectively); 2) the blank disc replacement got “lost in the mail”; 3) their technicians did not ruin my pictures because they’re very careful; and 4) a four month turnaround time is “normal,” as is charging customers several weeks before material is delivered. They received my pictures on 16 August and finally delivered (1/3 of) them on 2 November.
Priceless family photos were ruined; It took numerous emails just to get the blank disc replaced; no actual guarantee of anything except slow and inattentive service, excuses, and dishonesty. (I have a series of images and screenshots to prove each of the points where they changed their story or failed to provide service.)
Someone called Justin is the only one who does respond… though it’s usually to say my email was lost or misdirected or any excuse short of “the dog ate your photos of your deceased grandfather.”
I had the same problem with finding an address and still think it’s dishonest, just as their process of drawing out any customer complaints until the credit card dispute period has expired.